Introduction
Unit testing is great for validating algorithms in isolation, but it doesn’t give you full confidence that your future code changes won’t accidentally break something for the end user. Sometimes, even upgrading one single dependency, without touching a line of your own code, can lead to unexpected regression for end users of your project.
For automatically validating complete user scenarios, a dedicated type of testing exists - it’s called end-to-end (E2E) testing.
Obsidian itself is an Electron-based app, which means it’s built with web technologies and is powered by Chromium engine under the hood.
What if we could automate testing of crucial user scenarios of our Obsidian plugins to ensure that new changes never break existing functionality? In a way, similar to automated web apps testing. It would save developers significant amount of time, usually spent on manual testing before each release.
For automated E2E testing of web applications, frontend developers or QA engineers usually rely on powerful tools like Playwright/Cypress/Puppeteer/Selenium/etc. But testing an Obsidian plugin is different. The goal is not to test a website, but to test custom add-on running inside of an Electron-based desktop app (where we don’t even have access to application’s source code).
So, can E2E testing still be achieved in this case? Luckily, yes! But almost nobody is doing that (I’ve analyzed 2659 repos of currently available plugins and only few projects make attempts to perform some sort of E2E testing). I understand why. Getting started with E2E testing isn’t easy, especially without clear examples or documentation. So I decided to fill this gap and share my own journey to E2E testing of Obsidian plugins in a form of practical guide.
An approach to testing
Since Obsidian is an Electron app, E2E testing of Obsidian plugin essentially means testing of Electron app itself.
Does the official Electron documentation offer any solution for this? Historically, it mentioned “Spectron” tool, which was deprecated in 2022. As of October 2025 Electron docs recommend using WebdriverIO as a first possible option and in my article I will focus exactly on this solution.
WebdriverIO is an all in one testing framework built on top of the WebDriver (an open W3C standard and protocol for automating web browsers in a consistent, language-agnostic way).
To make it easy for WebdriverIO to work with Electron, there is a community-driven wdio-electron-service project.
It names itself a “Spiritual successor to Spectron”.
So, let’s get started.
Table of contents
Open Table of contents
Configure WDIO for testing Obsdian plugin
I have 2 Obsidian plugins projects on GitHub:
You can jump right in by cloning my repositories and exploring the codebase.
I like to keep the history of main branch clean and focused, making it easier (for both me and others) to follow the project’s evolution.
By browsing the commit history, you can clearly see how WDIO was integrated into each plugin step by step.
I initially started experimenting with WDIO in my Imgur plugin, but for the latest and more advanced setup I recommend looking into Timecodes plugin repository.
Below I will describe in details the process of integrating WDIO into your plugin’s repository.
Generate example project for E2E tests
For E2E tests I prefer to have separate directory with a dedicated package.json to avoid cluttering plugin’s main project with dependencies needed only for E2E testing.
So, let’s create special e2e directory and initialize example WDIO project in it:
mkdir e2e && cd e2e
pnpm create wdio@latest
Select the following options:
- “Desktop Testing - of Electron Applications” as a type of testing
- “Electron Forge” as a build tool (this actually doen’t matter, because we won’t build Obsidian from sources anyway)
- “Mocha (https://mochajs.org/)” as a test runner
- “TypeScript” for writing tests (for simplicity you can choose not to use TS, because sometimes you might face unpleasant typing bugs. On the other hand, why not? Obsidian plugin template has always been TypeScript-based, so you should already be comfortable with the language)
- Agree to generate example test case. It will help us to ensure that our setup for E2E testing is properly configured
As a result, several files will be generated to provide you a minimal configuration for E2E testing:
.
├── package.json # <-- dedicated independent package.json for WDIO project
├── test
│   └── specs
│       └── test.e2e.ts # <-- an example E2E test, that only reads and prints application's title for now
├── tsconfig.json
└── wdio.conf.ts # <-- WDIO configuration
It’s good idea to start exploring generated files with wdio.conf.ts.
It has many comments and you will see what configuration options are available.
Adjust WDIO configuration to start Obsidian
Open wdio.conf.ts and adjust capabilities section to help WDIO discover Obsidian executable:
  capabilities: [{
    browserName: 'electron',
    browserVersion: '37.6.0',
    'wdio:electronServiceOptions': {
      appBinaryPath: '/Applications/Obsidian.app/Contents/MacOS/Obsidian',
      appArgs: [],
    },
  }],e2e/wdio.conf.ts
Where does the browserVersion come from? It’s a version of Electron framework, used by the current build of Obsidian.
It’s easy to discover the right value. Just open “Developer Tools” in your Obsidian and type process.versions.electron in console.
After making the above adjustments to wdio.conf.ts execute pnpm run wdio.
WebdriverIO will start Obsidian and execute example test (from test/specs/test.e2e.ts), which will retrieve application’s title and print it to terminal:
[0-0] Hello Obsidian application!
Now, when we know target version of Electron, let’s add a couple more dependencies to E2E package.json to be able to write more advanced test scenarios:
pnpm install -D electron@37.6.0 obsidianLet’s also add some missing packages used as global types by tsconfig.json:
pnpm install -D @wdio/globals expect-webdriverio @types/node typescriptPreparing test vault with your plugin
Let’s remember our original goal and focus on testing of Obsidian plugin. Obsidian always works within the context of some vault, so let’s prepare an always fresh/clean vault with the latest build of your plugin.
Always test the latest fresh build of your plugin
To automatically build the most recent version of the plugin for testing, I use a very simple trick with pre-script.
For example, if E2E tests get invoked with wdio script declared package.json, I can add prewdio script, that will automatically build our Obsidian plugin right before starting tests with wdio task:
  "scripts": {
    "prewdio": "pnpm --dir .. run build",
    "wdio": "wdio run ./wdio.conf.ts"
  }e2e/package.json
Preparing test vault
You can use the following set of functions to prepare your test vault before actual execution of the test suite.
Create ObsidianApp class:
import * as fs from "node:fs/promises";

import { App } from "obsidian";

const TEST_VAULT_DIR = ".e2e_test_vault";
const YOUR_PLUGIN_ID = "your-plugin";

class ObsidianApp {
  async removeE2eTestVaultIfExists() {
    // test vault cleanup from previous tests execution
    await fs.rm(TEST_VAULT_DIR, { force: true, recursive: true });
  }

  async createAndOpenFreshVault() {
    await browser.execute((testVaultDir: string) => {
      const { ipcRenderer } = require("electron");
      const shouldCreateNewVault = true;
      // opening clean vault
      ipcRenderer.sendSync("vault-open", testVaultDir, shouldCreateNewVault);
    }, TEST_VAULT_DIR);

    // copying target plugin for testing
    const targetPluginsDir = `${TEST_VAULT_DIR}/.obsidian/plugins/${YOUR_PLUGIN_ID}/`;
    await fs.mkdir(targetPluginsDir, { recursive: true });
    await fs.copyFile("../manifest.json", `${targetPluginsDir}/manifest.json`);
    await fs.copyFile("../out/main.js", `${targetPluginsDir}/main.js`);

    await this.switchToMainWindow();
    await this.closeModal("Trust vault modal");
  }

  private async switchToMainWindow() {
    await browser.switchWindow("app://obsidian.md/index.html");
  }

  async activateTargetPluginForTesting() {
    await this.activatePlugin(YOUR_PLUGIN_ID);
  }

  private async activatePlugin(pluginId: string) {
    await browser.execute((yourPluginId: string) => {
      // @ts-expect-error 'app' exists in Obsidian
      declare const app: App;
      // enable community plugins
      app.plugins.setEnable(true);
      // enable target plugin for testing
      app.plugins.enablePlugin(yourPluginId);
    }, pluginId);
  }

  // a helper function to close any currently active modal window
  async closeModal(modalName: string) {
    console.log(`Closing '${modalName}'`);
    await $(".modal-close-button").click();
  }
}

export default new ObsidianApp();e2e/test/pageobjects/ObsidianApp.ts
Pay attention to value for const YOUR_PLUGIN_ID. You will need to set your own plugin’s id from manifest.json
Also, to avoid errors from TypeScript, let’s augment App type from obsidian package a litte bit:
import Plugin from "obsidian";

declare module "obsidian" {
  interface App {
    plugins: {
      plugins: Record<string, Plugin>;
      setEnable(toggle: boolean): void;
      enablePlugin(pluginId: string): void;
    };
    commands: {
      executeCommandById: (id: string) => boolean;
    };
  }
}e2e/test/types/obsidian.d.ts
The above fields and methods actually exist in Obsidian, they are just not exposed with obsidian package as public API for broad audience.
Now, let’s configure the vault’s preparational steps of ObsidianApp to run before each E2E test suite execution, change your wdio.conf.ts as follows:
/// <reference types="wdio-electron-service" />

import ObsidianApp from './test/pageobjects/ObsidianApp'

export const config: WebdriverIO.Config = {
// ...
  mochaOpts: {
    ui: 'bdd',
    timeout: 60000,
  },
  beforeSuite: async () => {
    await ObsidianApp.removeE2eTestVaultIfExists()
    await ObsidianApp.createAndOpenFreshVault()
    await ObsidianApp.activateTargetPluginForTesting()
  },e2e/wdio.conf.ts
Interacting with Obsidian UI elements
Now, when clean test vault is automatically prepared on each startup of the test suite, let’s get our hands dirty by doing something more complicated and useful than retrieving Obsidian’s window title.
You might’ve noticed that I suggested to create ObsidianApp.ts in pageobjects directory.
Page Object is a simple pattern that helps you to avoid cluttering your test sceario with low-level machinery for accessing Obsidian (or web-page) elements.
Let’s enhance Obsidian pageobject with the ability to createa a new note.
Create new note and verify note’s content
  async createNewNote(content?: string) {
    // click "New note" button
    const newNoteButton = $('aria/New note')
    await newNoteButton.click()

    // focus on note editing area
    const noteContent = $('.workspace-leaf.mod-active .cm-contentContainer')
    await noteContent.click()

    if (content) {
      await browser.execute((content: string) => {
        // @ts-expect-error 'app' exists in Obsidian
        declare const app: App
        // paste Markdown text newly created note
        app.workspace.activeEditor!.editor!.setValue(content)
      }, content)
    }
  }e2e/test/pageobjects/ObsidianApp.ts
When we want to interact with UI elements of Obsidian as real user, we should first find it with a selector (e.g. $('aria/New note'))
and then perform some action (e.g. .click()).
There are no unique ids assigned to Obsidian UI elements,
so you will have to think carefully while designing your selectors (to make them robust and unambiguous even without ids).
To start working on creating selector, open Developer Tools in Obsidian and select a tool to inspect element:
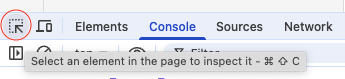
After that, click on the element you want to interact with and DevTools will highlight it in HTML code. You can then right-click an HTML element of your interest and choose “Copy -> Copy selector” to have something to start with.
Note, that for submitting desired text content with createNewNote(content?: string) function,
we could’ve emulated typing character by character or copying/pasting with a clipboard.
Howerver, unless the plugin we are testing doesn’t interrupt the process of manual editing of a note,
it’s easier to just use Obsidian’s API (editor.setValue(content)) to populate note’s content.
Let’s make sure the text gets rendered in Markdown-preview mode as expected. To achieve this, we will need a couple of methods to switch from “edit-mode” to “preview-mode” and retrieve resulting HTML code.
  async toggleReadingView() {
    await browser.execute(() => {
      // @ts-expect-error 'app' exists in Obsidian
      declare const app: App
      // again, using Obsidian command (for similicity and robustness)
      // instead of finding and clicking a button element,
      // our goal is not to test Obsidian itself
      app.commands.executeCommandById('markdown:toggle-preview')
    })
  }

  async getRenderedHtmlFromFirstPararraphOfCurrentNote(): Promise<string> {
    // reading the content of the first paragraph of a rendered note
    return await $('div.markdown-preview-section p[dir="auto"]')
      .getHTML({ includeSelectorTag: false, prettify: false }) as string
  }e2e/test/pageobjects/ObsidianApp.ts
The complete test should look as follows:
import ObsidianApp from "../pageobjects/ObsidianApp";

describe("Obsidian note", () => {
  it("should render bold text with <strong> HTML tag", async () => {
    await ObsidianApp.createNewNote("Hello **world**!");
    await ObsidianApp.toggleReadingView();

    const html =
      await ObsidianApp.getRenderedHtmlFromFirstPararraphOfCurrentNote();
    await expect(html).toBe("Hello <strong>world</strong>!");
  });
});e2e/test/specs/test.e2e.ts
Test scenarios development tips
Debugging
It’s much easier to compose and debug selectors in REPL mode.
You can use await browser.debug() at any point where you want WDIO to pause and
let you interact with REPL for testing your selectors.
It makes sense to increase overall tests execution timeout to avoid early exit from Obsidian while debugging in REPL mode. To do that I recommend adding something like this to wdio.conf.ts:
const debug = process.env.DEBUG
const ONE_DAY = 24 * 60 * 60 * 1000
// ...
  mochaOpts: {
    ui: 'bdd',
    timeout: 6000000,
    timeout: debug ? ONE_DAY : 60000,
  },e2e/wdio.conf.ts
Now you can increase WDIO timeout by prepending your command with DEBUG=y, i.e. DEBUG=y pnpm run wdio.
Best practices
Before writing any complicated test logic, it’s good to familiarize yourself with WebdriverIO best practices guide.
Linting
If you use ESLint, it makes sense to add eslint-plugin-wdio to know where to use await and to avoid some anti-patterns.
Advanced usage
Stubbing
Sometimes you might want your “plugin under to test” to avoid depending on the non-termenism of the “outside world”. Let’s see how you can create a stub to isolate your plugin from such non-determenism and always return pre-defined value.
One of the plugins I’ve been working on depends on network calls.
Suppose, I would want the following method to always return the same value without network calls:
export default interface ImageUploader {
  upload(image: File, albumId?: string): Promise<string>;
}
Here is an example of how an implementation of ImageUploader can be stubbed to always return pre-defined image url on upload() call:
import { App } from "obsidian";

const IMGUR_PLUGIN_ID = "imgur";

class MockingUtils {
  async stubUploadedImageUrl(stubbedUrl: string) {
    await browser.execute(
      (imgurPluginId: typeof IMGUR_PLUGIN_ID, uploadedImageUrl: string) => {
        // @ts-expect-error 'app' exists in Obsidian
        declare const app: App;
        // a function, that always returns a Promise with pre-defined url
        const uploadStub = () => Promise.resolve(uploadedImageUrl);
        // replace an original implementation of `upload` function with the stub
        app.plugins.plugins[imgurPluginId].imgUploader.upload = uploadStub;
      },
      IMGUR_PLUGIN_ID,
      stubbedUrl
    );
  }
}

export default new MockingUtils();e2e/test/utils/MockingUtils.ts
Collecting code coverage
As noted at the beginning, some pieces of code are good candidates for thorough unit testing or integration testing, whereas others are better covered by E2E testing.
It would be great if we could get cumulative code coverage metric from both - unit and E2E testing.
While working with unit tests, the process of configuring testing framework to measure code coverage is usually straightforward.
But how to collect code coverage meteric from E2E tests where:
- the plugin under test, originally implemented as a bunch of TypeScript files, is bundled into single
main.jsfile - the plugin gets executed witin Obsidian
- Obsidian gets launched and managed by WebdriverIO testing framework
To collect code coverage data in this situation, additional efforts are required.
Stage 1: instrument plugin’s code
The main.js needs to be instrumented, and sourcemaps should be chained (to not lose the data about original TypeScript sources).
We will need to add istanbul-lib-instrument package to perform instrumentation:
pnpm install -D istanbul-lib-instrument @types/istanbul-lib-instrumentLet’s create an utility function, that will instrument main.js and preserve sourcmaps to original TypeScript code:
import * as fs from "node:fs";

import { createInstrumenter } from "istanbul-lib-instrument";

export async function instrumentWithSourceMaps(inputFile, outputFile) {
  const code = fs.readFileSync(inputFile, "utf8");

  // Extract the original sourcemap from the bundled file
  const sourceMapMatch = code.match(
    /\/\/# sourceMappingURL=data:application\/json;base64,(.+)/
  );
  const sourceMapJson = Buffer.from(
    sourceMapMatch[1].trim(),
    "base64"
  ).toString("utf8");
  const originalSourceMap = JSON.parse(sourceMapJson);

  if (!sourceMapMatch) throw new Error(`No sourcemap found in ${inputFile}`);

  const instrumenter = createInstrumenter({
    esModules: false, // esbuild outputs Obsidian plugins as CommonJS
    compact: false,
    preserveComments: true,
    produceSourceMap: true,
    autoWrap: true,
  });

  const instrumentedCode = instrumenter.instrumentSync(
    code,
    inputFile,
    originalSourceMap // <- This is critical for sourcemaps remapping!
  );

  const sourceMap = instrumenter.lastSourceMap(); // chained sourcemap

  let output = instrumentedCode;
  if (!sourceMap) throw new Error("No source map found!");

  // adding chained sourcemap to instrumented main.js
  const base64SourceMap = Buffer.from(JSON.stringify(sourceMap)).toString(
    "base64"
  );
  output += `\n//# sourceMappingURL=data:application/json;base64,${base64SourceMap}`;

  fs.writeFileSync(outputFile, output, "utf8");

  console.log(`✓ Instrumented: ${inputFile} -> ${outputFile}`);
}scripts/utils/instrument.js
You can then use it like this in build script:
const prod = process.argv[2] === "production";
const coverage = process.argv[2] === "coverage";

const context = await esbuild.context({
  ...config,
  ...(prod ? { minify: true, sourcemap: false } : {}),
  ...(coverage ? { minify: true, sourcemap: "inline" } : {}),
});

if (prod) {
  await context.rebuild();
  process.exit(0);
} else if (coverage) {
  await context.rebuild();
  instrumentWithSourceMaps("out/main.js", "out/main.js");
  process.exit(0);
} else {
  await context.watch();
}scripts/esbuild.build.js
Let’s add one more build task:
    "build": "tsc -noEmit -skipLibCheck && node scripts/esbuild.build.js production",
    "build:coverage": "node scripts/esbuild.build.js coverage",package.json
And invoke it before running E2E tests:
  "scripts": {
    "prewdio": "pnpm --dir .. run build",
    "prewdio": "pnpm --dir .. run build:coverage",
    "wdio": "wdio run ./wdio.conf.ts"e2e/package.json
Now Obsidian will execute instrumented plugin during E2E testing.
Stage 2: Coverage data retrieval
Next, code coverage data needs to be somehow retrieved from an instance of Obsidian running under tests.
While WebdriverIO will execute E2E test scenarios within test instance of Obsidian,
our instrumented plugin will accumulrate coverage data inside of a global object referenced by window.__coverage__.
Let’s collect coverage data and dump it on a disk as lcov.info.
You will need to add the following dependencies:
pnpm i -D istanbul-reports @types/istanbul-reports \
          istanbul-lib-report @types/istanbul-lib-report \
          istanbul-lib-coverage @types/istanbul-lib-coverage \
          istanbul-lib-source-maps @types/istanbul-lib-source-maps
Here is the utility function, that will generate code coverage LCOV and HTML reports inside of out/coverage/ directory:
import type { CoverageMapData } from "istanbul-lib-coverage";

import * as fs from "node:fs";
import * as path from "node:path";

import { createCoverageMap } from "istanbul-lib-coverage";
import { createContext } from "istanbul-lib-report";
import { createSourceMapStore } from "istanbul-lib-source-maps";
import * as reports from "istanbul-reports";

export async function exportCoverageToLcov() {
  // collecting from `window.__coverage__` object
  const coverageMap = createCoverageMap(await collectCoverageData());
  // transforming coveragae data back to original TypeScript sources
  const remappedCoverageMap =
    await createSourceMapStore().transformCoverage(coverageMap);

  const context = createContext({
    coverageMap: remappedCoverageMap,
    dir: "out/coverage",
    sourceFinder: (filePath: string) => {
      // some help is required to find original TypeScript sources
      return fs.readFileSync(
        restorePathRelativeToMainPluginProject(filePath),
        "utf-8"
      );
    },
  });
  // writing both HTML and LCOV reports
  reports.create("lcov").execute(context);
}

const cwd = process.cwd();

function restorePathRelativeToMainPluginProject(filePath: string) {
  const relativePart = path.relative(cwd, filePath);
  // original TypeScript sources are located in parent directory
  return path.join(path.resolve(cwd, ".."), relativePart);
}

async function collectCoverageData() {
  const coverageData = await browser.execute(() => {
    return window.__coverage__;
  });
  if (!coverageData) throw new Error("No coverage data found!");
  return coverageData;
}

declare global {
  interface Window {
    __coverage__?: CoverageMapData;
  }
}e2e/test/utils/coverage.ts
It makes sense to ivoke exportCoverageToLcov() as afterSuite hook to automatically produce code coverage reports:
/// <reference types="wdio-electron-service" />
import ObsidianApp from './test/pageobjects/ObsidianApp'
import { exportCoverageToLcov } from './test/utils/coverage'
//...
  beforeSuite: async () => {
    await ObsidianApp.removeE2eTestVaultIfExists()
    await ObsidianApp.createAndOpenFreshVault()
    await ObsidianApp.activateTargetPluginForTesting()
  },
  afterSuite: async () => {
    await exportCoverageToLcov()
  },e2e/wdio.conf
Now code coverage reports from both types of testing can be combined (e.g. to display overall coverage in SonarQube portal)
Congratulations! You’ve already learned quite a lot of advanced stuff about E2E testing of Obsidian plugins with WebdriverIO. The limitation though is that you only know how to run such tests locally.
The next section will explain how to make it possible to run E2E tests in CI.
Running E2E tests in CI
The challenge with running E2E tests in CI is that E2E tests requie display for running GUI app (while CI agents usually don’t have one). Luckily, in the world of software we can easily get a virtual one.
The main tool you will need here is the xvfb (X virtual framebuffer).
Having xvfb installed, the easiest way to run software requiring a screen
is to prepend your command with xvfb-run.
In our case, the command will be xvfb-run obsidian (for ensuring Obsidian can get started at all) or xvfb-run pnpm run wdio (for running E2E tests).
In order to prepare the same environment, which you can easily run locally and in CI, let’s build a special Docker image, which will be further used as CI runner.
Usually I prefer to create smallest possible images, so I’ve made the following choices here:
- since Obsidian plugin build and E2E test suite are powered by NodeJS, let’s pick a NodeJS image based on minimalistic
debian:<suite>-slim - use multi-stage Docker build
- download AppImage build of Obsidian and extract its content to filesystem to avoid dealing with Fuse and compatibility issues on Apple Silicon
- install only necessary dependencies for running Obsidian on
debian:slimDocker image
Here is how my resulting Dockerfile looks like:
ARG NODEJS_VERSION=22
ARG DEBIAN_VERSION=trixie
ARG BASE_IMAGE=node:${NODEJS_VERSION}-${DEBIAN_VERSION}-slim

ARG OBSIDIAN_VERSION=1.9.14
ARG OBSIDIAN_APPIMAGE_FILE=Obsidian-${OBSIDIAN_VERSION}.AppImage

FROM busybox:latest AS obsidian-downloader
ARG OBSIDIAN_VERSION
ARG OBSIDIAN_APPIMAGE_FILE
# downloading Obsidian Appimage
RUN wget https://github.com/obsidianmd/obsidian-releases/releases/download/v${OBSIDIAN_VERSION}/${OBSIDIAN_APPIMAGE_FILE}

FROM ${BASE_IMAGE} AS obsidian-extractor
ARG OBSIDIAN_APPIMAGE_FILE
COPY --from=obsidian-downloader /${OBSIDIAN_APPIMAGE_FILE} /${OBSIDIAN_APPIMAGE_FILE}
RUN chmod +x ${OBSIDIAN_APPIMAGE_FILE}
# extracting Obsidian Appimiage content to filesystem
RUN ./${OBSIDIAN_APPIMAGE_FILE} --appimage-extract

FROM ${BASE_IMAGE}
RUN apt-get update && \
    apt-get install -y --no-install-recommends --no-install-suggests \
      # some must-have libraries to run 'obsidian' executable
      libgtk-3-0 libnss3 libgbm1 libasound2 \
      xvfb xauth && \
    rm -rf /var/lib/apt/lists/*

COPY --from=obsidian-extractor /squashfs-root /obsidian-appimage-extracted

ENV OBSIDIAN_BINARY_PATH=/obsidian-appimage-extracted/obsidian
ENV OBSIDIAN_NO_SANDBOX=true

RUN corepack enable pnpm

# for running locally as: docker run --rm -it -v ${PWD}:/plugin local-ci-runner
WORKDIR /plugin
CMD ["sh", "-c", "pnpm i && cd e2e && pnpm i && xvfb-run pnpm run test"]docker/ci-runner.Dockerfile
If your host PC has x86_64 CPU architecture, you can build the image and ensure that now E2E tests can be executed inside of Docker container:
docker build -f docker/ci-runner.Dockerfile . -t obsidian-e2e-tests-runner
docker run --rm -it -v ${PWD}:/plugin obsidian-e2e-tests-runner
The benefit of having dockerized environment for CI/CD is that you can easily debug this environment locally.
But there is a problem if your development machine is an Apple Silicon Mac:
while the arm64 build of Obsidian exists, there is no Chromedriver built for arm64.
Which means it’s not possible to run WDIO-based E2E tests inside of linux/arm64 Docker container.
Luckily, with Rosetta it’s still possible to run amd64 Obsidian inside of Docker even on Apple Silicon Mac.
If you use Docker Desktop, chances are that you already have Rosetta installed and propery configured with the following defaults in Docker Desktop settings:
- “Apple Virtualization Framework” is chosen as a “Virtual Machine Manager”
- and “Use rosetta for x86_64/amd64 emulation on Apple Silicon” checkbox enabled
Now let’s enforce usage of linux/amd64 image even on Apple Silicon Mac:
# ...
ARG BASE_IMAGE=node:${NODEJS_VERSION}-${DEBIAN_VERSION}-slim
ARG TARGET_IMAGE_PLATFORM=linux/amd64
# ...
FROM ${BASE_IMAGE} AS obsidian-extractor
FROM ${BASE_IMAGE} AS obsidian-extractor-amd64
ARG OBSIDIAN_APPIMAGE_FILE
COPY --from=obsidian-downloader /${OBSIDIAN_APPIMAGE_FILE} /${OBSIDIAN_APPIMAGE_FILE}
RUN chmod +x ${OBSIDIAN_APPIMAGE_FILE}
RUN ./${OBSIDIAN_APPIMAGE_FILE} --appimage-extract

# `--appimage-extract` won't work on Apple Silicon even with Rosetta, so using a special extraction stage
FROM --platform=${TARGET_IMAGE_PLATFORM} ${BASE_IMAGE} AS obsidian-extractor-arm64
ARG OBSIDIAN_APPIMAGE_FILE
RUN apt-get update && \
    apt-get install -y squashfs-tools && \
    rm -rf /var/lib/apt/lists/*
COPY --from=obsidian-downloader /${OBSIDIAN_APPIMAGE_FILE} /${OBSIDIAN_APPIMAGE_FILE}
RUN offset=$(grep -aob 'hsqs' ${OBSIDIAN_APPIMAGE_FILE} | tail -n1 | cut -d: -f1) && \
dd if=${OBSIDIAN_APPIMAGE_FILE} of=image.squashfs bs=4M iflag=skip_bytes,count_bytes skip=$offset status=progress && \
unsquashfs image.squashfs

FROM obsidian-extractor-${TARGETARCH} AS obsidian-extractor

FROM ${BASE_IMAGE}
FROM --platform=${TARGET_IMAGE_PLATFORM} ${BASE_IMAGE}
RUN apt-get update && \
# ...docker/ci-runner.Dockerfile
After making the above adjustments to the Dockerfile,
you can run E2E test suite in exactly the same Docker container in both envs - CI and and your local machine
(even if your Docker host is an Apple Silicon Mac).
Switching your GitHub Actions build pipeline from running on ubuntu-latest host machine
to a special Docker container suitable for E2E testing will be as easy as:
    runs-on: ubuntu-latest
    container:
      image: ghcr.io/${{ github.repository }}/your-custom-ci-runner-with-e2e-support.github/workflows/your-ci-pieline.yml
Advanced reporting
In this last section I will briefly give you several ideas on advanced reporting.
Would’t it be cool to get beautiful and informative report from CI?
- with
@wdio/allure-reporterwe can get nicely looking HTML reports, which can be either saved as build artifact or published to GitHub pages:
  reporters: ['spec']
  reporters: [
    'spec',
    ['allure', {
      outputDir: 'out/allure-results',
      disableWebdriverStepsReporting: true,
    }],
],e2e/wdio.conf.ts- the Allure report can also be enriched with a screenshot of a failed test
You just simply take a screenshot if a test has failed and it will automatically be attached to Allure report:
  afterTest: async function (_test, _context, { error }) {
    if (error) {
      await browser.takeScreenshot()
    }
},e2e/wdio.conf.ts- or we can go even further and use
wdio-video-reporterto get a video recording of a failed test right in Allure HTML report:
  reporters: [
    'spec',
    ['video', {
      saveAllVideos: false,       // If true, also saves videos for successful test cases
      videoSlowdownMultiplier: 3, // Higher to get slower videos, lower for faster videos [Value 1-100]
    }],
    ['allure', {
      outputDir: 'out/allure-results',
      disableWebdriverStepsReporting: true,
    }],
  ],e2e/wdio.conf.ts
Conclusion
E2E testing of Obsidian plugins is absolutely achievable. WebdriverIO has proven to be a powerful tool for simulating user behavior in Electron-based apps and verifying real scenarios from start to finish.
While the initial setup requires some effort, it quickly pays off. With this foundation established, extending your test suite or integrating it into your CI pipeline becomes straightforward — enabling you to test, refine, and release your plugins with confidence and far less manual work.